Writing your first local unit test in Android
Hello everyone. I hope you are doing well. This blog post is about writing your first local unit test in Android. Testing is an integral part of the Software Engineering and testing will help you write software that is robust and behaves the way you intend it to. Tests can also serve as future reference documents as to how the software was originally built to work.
Types of testing in Android
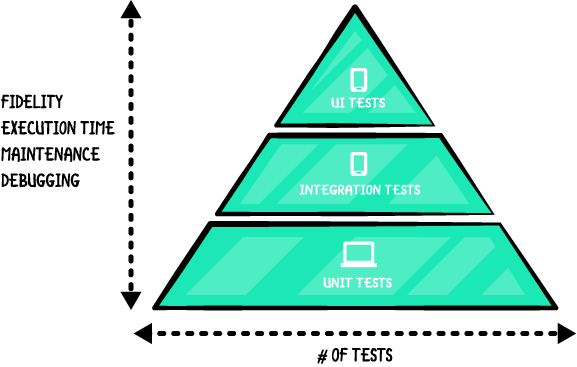
While there are different types of testing in the software engineering field, viz. Unit Testing, Integration Testing, White Box Testing, Black Box Testing, etc., we will be focusing on the Android Specific testing. There are two types of testing in Android which are Local Testing and Instrumented Testing. Out of the two, we will be focusing on the Local Testing in this post.
Local Unit Test vs. Instrumented Tests
In Android, Local Unit tests refer to those tests that does not require an Android Device(physical device or emulator) Instrumentation. These tests run on the local JVM(Java Virtual Machine) of your development environment, thus the name Local Unit Test.
Instrumented tests on the other hand are tests that need to utilize on the Android framework thus a device to run.
Hence, local tests run much faster than the instrumented tests as they do not require Android Device instrumentation. Use Instrumented tests only when writing integration and functional UI tests to automate user interaction, or when your tests have Android dependencies that mock objects cannot satisfy. For a complete read follow this link.
Writing your first local unit test.
Now I assume you have your Android studio setup and have some knowledge on Android Development. The first thing I want you to do is create an Android Project, File>New>New Project.


Then choose Empty Activity Template from the next screen. After Android Studio finishes building your Project and Indexing, choose Run>Run App from the toolbar menu or hit F6 key, just to make sure everything is alright.
Lets now write a utility class for this demo. Lets say we need an App that does simple mathematics like addition, subtraction, multiplication and division. We will now write a SimpleMath.java class. Right click on your main package, com.example.javaand select New>New java class. Name it SimpleMath
package com.example.testdemo;

public class SimpleMath {

    public int add(int op1, int op2){
        return op1 + op2;
    }

    public int diff(int op1, int op2){
        return op1-op2;
    }

    public double div(int op1, int op2) {
        if (op2 == 0) return 0;
        return op1 / op2;
    }
}
I hope you understand what is going on until this point. The class above is fairly straightforward. Now lets proceed to writing our first unit test. Recall from above section Local Unit Test vs. Instrumented Tests, they are two different things which is also reflected in the directory structure. We have app\src\androidTest and app\src\test. We are going to have to put our Local Unit tests in the latter.
Before we begin, I want you to check your app level build.gradle file to see if you have the correct dependencies for setting up local unit tests. By default the android studio should have put those there but if not copy paste the following:testImplementation 'junit:junit:4.12' or testCompile 'junit:junit:4.12' if you are running older gradle plugin.
Right click on your test folder (not androdTest folder) and click New>Java Class. Name it SimpleMathTest to reflect the unit test is for SimpleMath.java.
package com.example.testdemo;

import org.junit.After;
import org.junit.Before;
import org.junit.Test;

import static org.junit.Assert.assertEquals;

public class SimpleMathTest {
    private SimpleMath simpleMath;

    @Before //This is executed before the @Test executes
    public void setUp(){
        simpleMath = new SimpleMath();
        System.out.println("Ready for testing");
    }

    @After //This is executed after the @Test executes
    public void tearDown(){
        System.out.println("Done with testing");
    }

    @Test
    public void testAdd() {
        int total = simpleMath.add(4, 5);
        assertEquals("Simple Math is not adding correctly", 9, total);
        //The message here is displayed iff the test fails
    }

    @Test
    public void testDiff() {
        int total = simpleMath.diff(9, 2);
        assertEquals("Simple Math is not subtracting correctly", 7, total);
    }

    @Test
    public void testDiv(){
        double quotient = simpleMath.div(9,3);
        assertEquals("Simple math is not dividing correctly", 3.0, quotient, 0.0);
    }

    //@Ignore //This ignores the test below
    @Test
    public void testDivWithZeroDivisor(){
        double quotient = simpleMath.div(9,0);
        assertEquals("Simple math is not handling division by zero correctly", 0.0, quotient, 0.0);
    }

}
Explanation:
The code private SimpleMath simpleMath; declares an instance of the SimpleMath class in this test class. The JUnit here is the test framework, it provides us with easy to read Annotations like @Before, @After and @Testand shares similar syntax and/or approach across other programming paradigms like JSUnit for Javascipt, PHPUnit for PHP, etc.
Now as the comments indicate, @Before is executed before the actual @Test executes. We have instantiated the simpleMath object in the setUpmethod (function).
We have written 4 methods with @Test annotation, which means we have 4 unit tests that can either pass or fail. The testAddmethod tests the Addition functionality of SimpleMath. In this method we have used the simpleMath instance to add 4 and 5 and store it in an int total . In the next line assertEquals("Simple Math is not adding correctly", 9, total);we are checking if totalis or is not equal to 9, which it should be if our SimpleMath class is functioning correctly. The assertEquals() is one of the many static methods provided by the junit framework. It takes at least two parameters as the String parameter is optional which is displayed in case of test failure. The second and third parameters of the assertEquals method are expected and actual value in strict order.
Run the testAdd()

To run the test add either select the Green play button on the right of the line numbers or select the testAdd method right click and select Run testAdd(). If you run into error like TestSuite Empty which I hope you don’t, just click Run>Edit Configurations and Remove the test configurations under JUnit

If everything goes well you should see something like the following:

And you have now written your first local unit test in Android Application. Also notice how fast the test runs and how we did not need to use any device or emulator as the SimpleMath class does not require any Android Instrumentation or device features. The JVM on your development machine and the JVM on your phone is exactly the same and we can thus ensure the functionality that we just tested will work fine in an Android Device too.
Explore
I could go on and describe all other test methods in the SimpleMathTest.java but I am not going to. I encourage you run other test methods and see if they pass or fail. Uncomment the @Igonre and run the SimpleMathTest.java , the whole TestSuite and see what happens. Remove line if (op2 == 0) return 0; from div() method of SimpleMath.java and run the testDivWithZeroDivisor() method to see if it passes or not. Do some further reading about JUnit here and do some research on your own. Do comment or contact me if you get stuck following this blog post.
Thank you and happy coding.
What's Your Reaction?
 Like
0
Like
0
 Dislike
0
Dislike
0
 Love
0
Love
0
 Funny
0
Funny
0
 Wow
0
Wow
0
 Sad
0
Sad
0
 Angry
0
Angry
0


Comments (0)